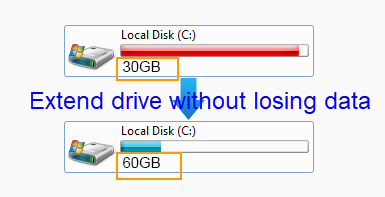
Normally while extending partition during Windows installation, we keep the storage space for System Partition at least close to 100GB. But, eventually the storage bar indicator turns red and you feel the need for more storage space on your drive. Well, you probably must be knowing that the inbuilt disk management utility in Windows 10 won’t let you extend your system drive. Even though you have enough unallocated space, the Extend Partition option will be greyed out.
Yes, you can manually extend system partition by backing up the logical drives and deleting them. And, thereafter extending system partition using the available space. But, that’s a tedious task and will take too much time. So, here I’d like to show you how you can easily extend system partition without doing any backup or deletion of logical partitions.
How to Extend System Partition using AOMEI Partition Assistant
The software we’ll use here is called AOMEI Partition Assistant. . You can try out EaseUS Partition master too if you want to. But, AOMEI Partition Assistant is used for this guide. And, we totally recommend it.
Download and install the software. The software is packed with many features with some being blocked behind the paywall. But, the one feature that we are going to use here is free. It’s called the Extend Partition Wizard.
You can approach this system partitioning guide in two ways. You can let the software shrink the logical drives for you. Or you yourself can shrink a specific logical drive and create unallocated space. If you want the wizard to choose a specific unallocated space then you should approach the second way. But, if you want the wizard to automatically shrink the logical drives and transfer space to system partition then choose the first way.
For the second way, only unallocated space will be used. No shrinking process will be applied. So, the second way will be faster. If you have an SSD on your PC, then you can choose the first way. It will speed up the process and will shrink faster.


On the next screen set the partition size for your system drive. You can drag to set the value or manually add the value. But, not greater than maximum partition value. Once selected, click Next.

The next screen will show you from which drive storage is being taken. If there’s unallocated space with other drives then the wizard will take those unallocated spaces too. Don’t worry, only the drive you selected will be shrunk. That too, only if necessary. If that drive has enough unallocated space then that will be used.
So, after the partitioning is over you should get the following message.
Here, I added 20GB to my system drive. Next, I’ll add another 20GB using the second method by selecting the unallocated space.
Method-2: Using Unallocated Space (Manual Shrinking)